Sunday, April 10, 2011

Stephanie's Smoothie

Evan has been sick for about a week, so not a lot of recipe experimentation has been going on here. He's fine during the day, but throws up in the middle of the night. Not fun. I thought he was doing better because we just made it two days, but he was up at midnight last night. Dan hadn't even made it home from Red Robin (his part-time job) yet, so that was a blast by myself. I've been so thankful to have Dan here to help with clean-up... or at least to sit with Evan and read to him while I cleaned it up. We've got to get it under control because a week from today we'll be headed to my mom's for almost two weeks while we have some contractors here to do some work on our house. Evan will be sleeping in his play-yard (if he's not too long for it by now!) and if he vomits all over the side of that, it's done for. So we really need to get over this. Plus, I want him to feel better. He didn't really want anything for breakfast this morning, but I made him this smoothie and he went to town on that. I know it's not really part of a BRAT diet, but yogurt's now supposed to be reccomended, too, because of all the probiotics. Anyway, onto the recipe...

My friend Stephanie gave me this recipe and the only change I've made is that she uses strawberries where I use mango, but Evan's allergic, so I had to substitute. These are so fast and so good.

1/2 c. rice milk
1/2 c. frozen blueberries (70g)
1 c frozen mango (186g)
6 oz. plain coconut milk yogurt

Simply mix in a blender until smooth. Stephanie also says that these freeze well as popsicles, although we haven't tried it here yet.

Tuesday, April 5, 2011

Banana Chocolate Chip Cookies

I'm still behind. I know, I know. Still working on it... obviously not getting quite where I want to be. But hooray- here's a new recipe for today at least.

I am super proud of these cookies because I was able to recreate my old favorites in a version that is not only safe for Evan, but healthier, too! These cookies are not your typical chocolate chip, but are more like little morsels of banana chocolate chip bread/muffins. In fact, when Evan tried these, he said “It’s a muffin!” which, from him, is a huge compliment. These cookies are also quick and easy, which is always a plus, too!

Banana Chocolate Chip Cookies
1¼ c. brown rice flour (200g)
1¼ c. gluten-free oat flour (150g)
1 tsp. baking soda
1 tsp. baking powder
3 large ripe bananas
⅜ c. canola oil
⅜ c. pure maple syrup
½ tsp. vanilla
1 c. Enjoy Life mini chocolate chips (175g)

In a large bowl, combine the first four ingredients. Then in a blender, pureƩ the next four, until smooth. Pour the wet ingredients from the blender into the bowl and mix until well-combined. Stir in chocolate chips.

Drop cookies onto baking sheet by the tablespoon. Bake for 10 minutes at 350° and cool on wire racks.

Note: My original NOT-allergy-friendly cookie recipe was from Gooseberry Patch Family Favorites and I worked from that and then borrowed from the recipe for Banana Coconut Chocolate Chip Cookies from Clean Food by Terry Walters. Also, this recipe makes about 45 cookies. Yum!

Wednesday, March 16, 2011

Granola Bars

Warning: These are addictive. Don't say I didn't warn you.

The original recipe for “New Zealand Oaty Bars” is one that I used for my food project when I was in 4-H. I’m not sure where it’s from, though. In my version, I reduced the margarine from ½ to ⅓ c. and, of course, made allergy-friendly substitutions. We have to take a break from them here for a little bit because Earth Balance, our favorite dairy-free margarine has changed their ingredients! I'm going to try to see if I can find any more of the old ones before I have to find a new brand.

Granola Bars

⅓ c. margarine
2 c. gluten-free rolled oats (192 g)
¼ c. sugar
1 Tbsp. soy “nut” butter
¼ c. Enjoy Life chocolate chips (50g)

Melt margarine and stir in sugar and oats. Add soy “nut” butter and chocolate chips and mix well. Press the mixture into a 9x9 microwave-safe baking dish. Microwave on high for 3½ minutes. Cool until close to room temperature. The refrigerate for 15-30 min. before cutting into bars. If they are crumbly, they’ll still be yummy enjoyed with a spoon in a bowl!

Tuesday, March 15, 2011

Pizza Sauce

I am still behind. I know. This is the eleventh week of 2011, so this should be at least the eleventh recipe that I am posting. It's number eight. I still want to finish my Tastebook before the end of the year, so technically some weeks should have at least two recipes, so I definitely have some catching up to do. I'm working on it!

This pizza sauce is from the book Incredible Edible Gluten-Free Food for Kids by Sheri L Sanderson. I had it from the library probably about a year ago. I had tried this pizza sauce for Dan and I and we really liked it. Last week was the first time Evan tried it and it was a big hit with him, too. Previously his only "pizza" was some leftover spaghetti sauce and fake cheese on top of some tapioca toast, but last week I tried Gluten-Free Bisquick and made the pizza crust on the side of the box. Amazing. I had to substitute Ener-G egg replacer for the eggs, but other than that I followed the recipe. Very good and very easy. Now for the recipe...

Pizza Sauce

1 15-oz. can tomato sauce
½ tsp. garlic powder
2 tsp dried basil, crushed
1 tsp. dried oregano, crushed
1 tsp. dried minced onion

Place all the ingredients in a medium saucepan. Bring to a boil. Reduce heat, cover, and simmer for 10 minutes.
Spoon the sauce onto a prepared pizza crust, or cool and store in the refrigerator for up to 2 weeks.


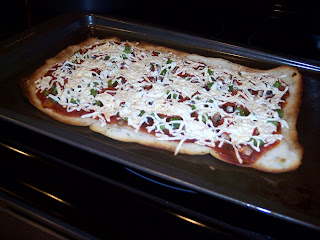
The results are one happy boy:

And one yummy pizza- topped with green pepper, mushroom, a few pepperonis, and some Daiya mozzarella shreds. Evan actually requested pizza again this Sunday, so of course, I obliged. And I was happy to do so!

Saturday, February 26, 2011

Overdue

This post is overdue, I know. My goal is to enter at least one recipe into my Tastebook each week and then blog it here. I owe you three this weekend. I am fairly certain there are no spelling errors here, but it IS midnight and we were up at 5:30am. (4:30 the day before!) I don't know how Dan is handling his schedule between his two jobs and the fire dept.- I'm barely handling it myself and I'm not working. Doing plenty at home, but nothing I get paid for! While I wait for him to come home from job #2, I'll post the first recipe of the weekend.
Michelle's Crispy Oven Fried Chicken

After searching the internet for just the right recipe and not finding it, I decided to come up with my own instead. And I am so glad that I did! Dan said it tasted like KFC, which, from him is a compliment! I chose not to figure exact measurements because it will never be the same, depending on how the chicken is cut.

boneless, skinless chicken breast- cut into strips and/or nuggets
olive oil
combination of rice and corn chex cereal, crushed (Evan loves to help with the crushing!)
salt
pepper
garlic powder

Prepare your three-step assembly line. First is a plate with the chicken, cut to desired size. Second, a bowl with olive oil in the bottom. Third, in a pie plate, combine crushed cereal with salt, pepper, and garlic powder, to taste. Be generous.

Take the chicken and dip in the olive oil, allowing the excess to drip off. Then, roll in chex mixture to coat. Arrange chicken pieces on greased baking sheet and bake at 450° for 16 minutes. Cut into one or two of the largest pieces to ensure that the chicken is cooked through. Enjoy!

Saturday, February 5, 2011

Evan's Chili Garlic Party Mix

I finally figured out a party mix to satisfy both boys in my house. Enough flavor for Dan, but not too much for Evan. And I like it, too! Happy to have finally figured this one out- just in time for our Superbowl party tomorrow night! Here's the original at chex.com and here is my version...


2 c. Corn Chex cereal (62 g)
2 c. Rice Chex cereal (54 g)
5 c. Mike Sell’s Puffcorn Delites (54 g)
2 Tbsp. canola oil
1 heaping tsp. chili powder
1 heaping tsp. garlic powder

In a large microwavable bowl, mix cereal and “popcorn.” Drizzle with oil and toss until evenly coated.
In a small bowl, combine the chili powder and garlic powder. Sprinkle over cereal mixture and toss until evenly coated.
Microwave uncovered for 3 to 4 minutes, stirring after each minute, until crisp. Spread on waxed paper to cool. Store in airtight container.


I am really looking forward to our Superbowl party tomorrow. Just a couple of friends coming, but Evan is excited because he knows we're having a football party. AND I am serving all food that is safe for him. Can't wait to see how it all turns out! Trying out a couple of new recipes, too, so excited for that. I don't really care about football, but still looking forward to a fun time together. And a full day to have my husband at home. It doesn't happen often and his schedule just got even crazier, so extra thankful for the time we do have together!

Friday, January 28, 2011

Country Apple Coleslaw

I am very thankful that Evan is such a good eater. It is true that there are a lot of things that he can't eat because of his food allergies, but he truly is a good eater. He likes to eat. And he likes to eat a lot. I didn't really expect him to eat this coleslaw, but it was safe for him, so I let him try it. And he LOVES it! He calls it "cole-slot" and it makes me smile every time he asks for more. This recipe is super easy and comes from The Gluten-free Gourmet Cooks Comfort Foods by Bette Hagman.


Country Apple Coleslaw

¼ c. apple cider vinegar
3 Tbsp. brown sugar
¼ tsp. salt
10 oz. package of coleslaw
2 c. apples, chopped (do not peel)
½ c. raisins

In a microwavable salad bowl, combine vinegar, brown sugar, and salt. Microwave on high for one minute.
Add the remaining ingredients and toss well to coat. Chill or serve at room temperature.